
You load a fresh roll of labels, hit print — and every single label comes out with the same white stripe running top to bottom. Or maybe the print has been gradually fading for days, and now barcodes are failing to scan at the warehouse door. Either way, the question is the same: is this the printhead, or something else?
For anyone managing Zebra label printers in a production, logistics, or retail environment, printhead problems are one of the most disruptive and expensive issues you can face. A replacement printhead for an industrial Zebra model can cost $350 to $950 or more — and that figure does not include the cost of production downtime, wasted labels, or failed shipments while you wait for a replacement to arrive.
The frustrating reality is that most printhead failures are preventable, and many apparent failures are not actually failures at all — they are contamination that a $2 cleaning wipe would have resolved. This guide gives you the full picture: what actually causes Zebra printhead failure, how to read the symptoms accurately, and the specific steps that prevent premature failure in the first place.
Table of Contents
- How to identify a failed heating element
- The 4 root causes of Zebra printhead failure
- Reading the warning signs: what each symptom actually means
- 6 prevention steps that protect your Zebra printhead
- Prevention checklist at a glance
- When replacement is the only answer
- Frequently asked questions
How to Identify a Failed Heating Element
The most recognisable sign of printhead failure in a Zebra printer is a straight, fixed vertical white line running from the top to the bottom of every label — in exactly the same position on every print. This line does not move, does not change width, and does not disappear between labels.
What this means: one or more of the microscopic heating elements in the printhead have stopped generating heat. Standard Zebra thermal printheads contain 8 or 12 heating elements per millimetre, each one smaller than a human hair. When a single element fails, it leaves a blank stripe on every label it should have printed.
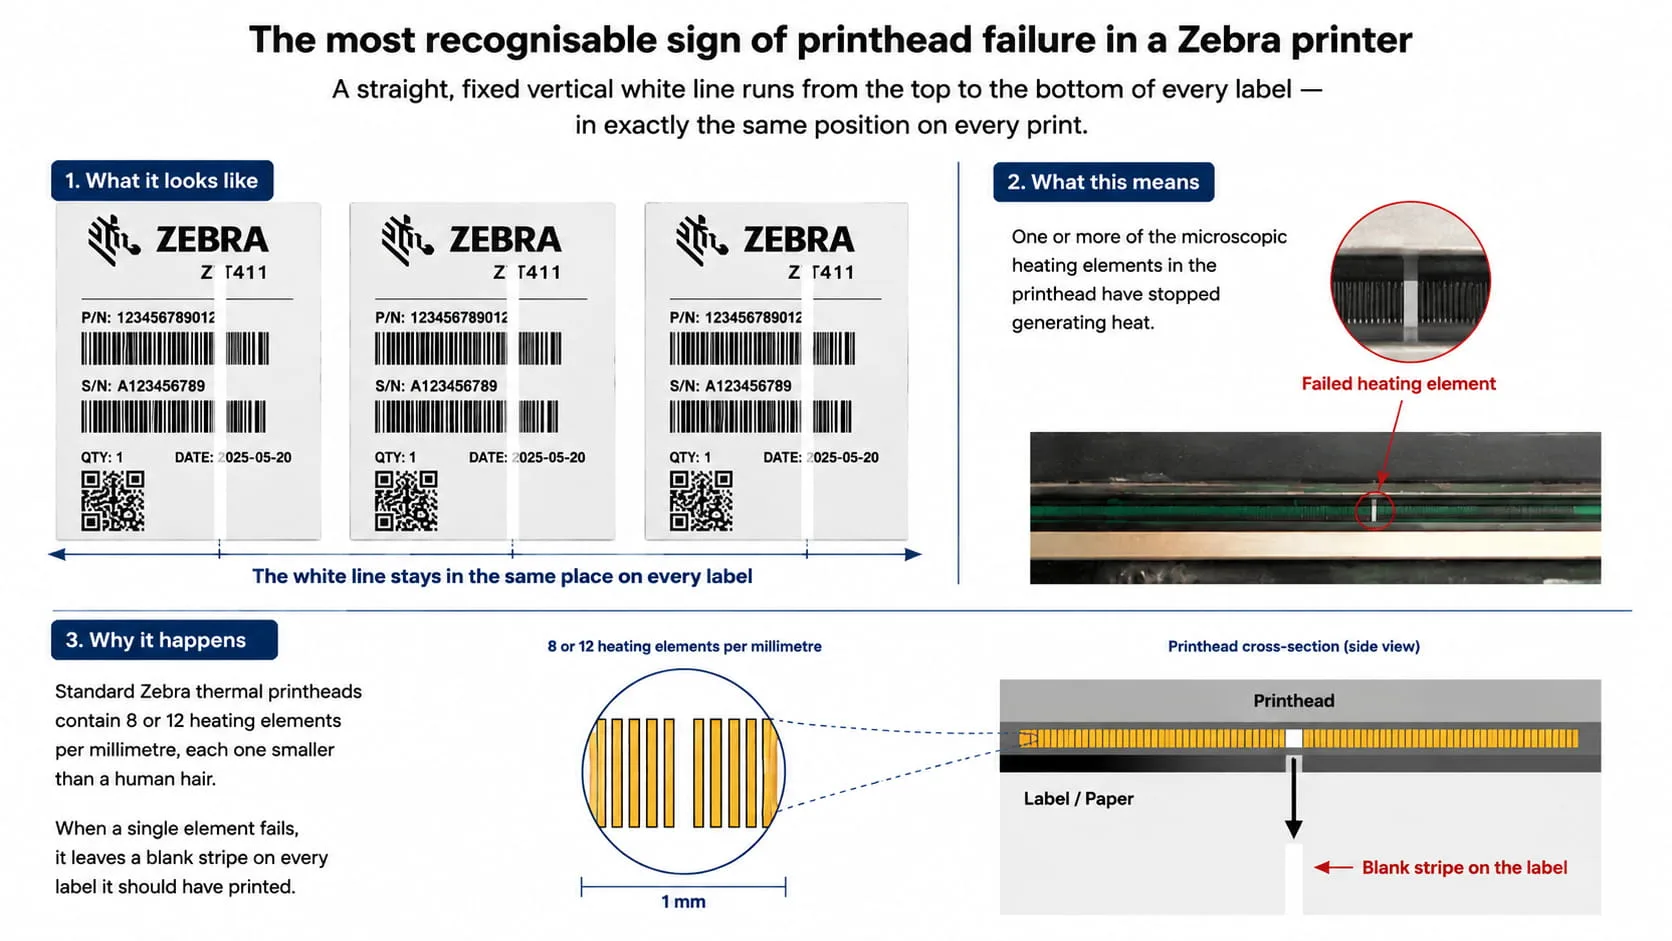
The critical diagnostic question is whether the line clears after cleaning or not:
- Line disappears after cleaning with IPA: The element was blocked by debris — adhesive residue, ribbon wax, paper dust. The printhead is fine. Resume printing after the head dries completely.
- Line returns immediately on clean media with a fresh ribbon: The heating element has permanently failed. The printhead cannot be repaired and must be replaced.
- Multiple lines appearing suddenly: Either severe debris accumulation (clean first) or the printhead has reached end of life and multiple elements are failing together.
Always clean before concluding that replacement is necessary. Many printheads are replaced unnecessarily — at significant cost — when cleaning would have resolved the issue.
The 4 Root Causes of Zebra Printhead Failure
Zebra’s own printhead maintenance documentation identifies four primary failure mechanisms. Understanding each one helps you address the actual cause rather than just treating symptoms.
1. Abrasive Wear — The Most Common Cause
Every label and ribbon that passes across the printhead surface creates friction. Over time, this friction erodes the protective ceramic coating on the printhead, eventually exposing the delicate heating elements. Once the protective layer is compromised, wear accelerates — producing progressively wider void lines until the head fails entirely.
Abrasion is accelerated by:
- Dust or grit particles on label surfaces — even microscopic particles act as sandpaper against the element line
- Low-quality labels with rough, uneven, or inconsistent surfaces
- Labels that have been dropped on the floor and picked up contamination
- A ribbon narrower than the label web — exposing printhead edges to direct contact with abrasive label stock
- A dirty or worn platen roller transferring debris back onto the printhead surface
- Excessive printhead pressure settings creating unnecessary friction
2. Contamination Buildup — Burns Out Elements
Adhesive residue, ribbon wax deposits, paper fibres, and dust accumulate on the printhead surface over time. When this buildup covers a heating element, it acts as an insulator — the element generates heat but cannot transfer it to the media. The heat has nowhere to go, and the element overheats and burns out permanently.
Burned elements are also caused by:
- Inferior ribbons that leave excessive wax deposits on the printhead surface
- Low-quality labels with adhesive that migrates onto the printhead
- Long standby periods with the printhead engaged over direct thermal media in humid environments — this can cause galvanic corrosion as moisture reacts with printhead voltage
- Excessive print darkness settings that stress every element beyond its optimal operating range
3. Electrostatic Discharge (ESD) — Instant Damage
The Zebra printhead is highly sensitive to electrostatic discharge. Zebra’s technical documentation notes that as little as 250–300 volts of ESD at the connector end of the printhead can cause permanent damage — and a human body can carry 10,000 volts or more of static charge without feeling anything. A single discharge during media loading, cleaning, or printhead handling can destroy internal circuits instantly, producing failures that appear unrelated to mechanical wear.
ESD risk is highest in dry environments, during winter, on synthetic flooring, and when operators are wearing non-conductive footwear.
4. Chemical Corrosion — From Wrong Cleaning Products
Using unapproved cleaning solutions — household cleaners, acetone, nail polish remover, or alcohol concentrations below 70% — can chemically attack the printhead coating, connector contacts, and internal circuitry. Sweat from bare fingers touching the printhead surface is also a source of corrosive contamination. This type of damage accumulates invisibly until it causes sudden failure.
Reading the Warning Signs: What Each Symptom Actually Means
| What You See on the Label | Most Likely Cause | First Action |
|---|---|---|
| Single vertical white line, same position every label | Debris on one element, or burned element | Clean with IPA — if line persists on clean media, replace head |
| Multiple vertical white lines appearing suddenly | Severe contamination buildup, or printhead at end of life | Thorough cleaning first — if lines persist, replacement needed |
| Overall fading across the full label width | Settings issue — darkness too low, speed too high, wrong ribbon type | Increase darkness setting by 2 increments, check ribbon/media match — almost never a printhead problem |
| Smearing or ink drag across the label | Ribbon installed incorrectly, or print speed too high for ribbon type | Check ribbon orientation and reduce print speed |
| Uneven density — darker on one side than the other | Uneven printhead pressure across the media width | Adjust printhead pressure balance — refer to printer manual |
| Intermittent voids that move position between labels | Moving debris or contaminated media surface | Clean printhead and platen roller, inspect media quality |
| Printer pauses mid-job with “printhead over temperature” alert | Continuous high-volume printing without cool-down, or high ambient temperature | Allow head to cool — printer will resume automatically. Reduce print speed or darkness if recurring |
6 Prevention Steps That Protect Your Zebra Printhead
1. Use Ribbon Wider Than the Full Label Web — Always
This is the single most overlooked prevention measure. The ribbon must cover not just the printed label area, but the complete media web width including the liner on both sides. Label edges are sharp. When ribbon is narrower than the media, the exposed printhead edges come into direct abrasive contact with the label liner on every print cycle — the fastest path to edge wear and element failure.
Use a ribbon that extends at least 2–3 mm beyond the label web on each side. The cost difference is negligible compared to a printhead replacement.
2. Use High-Quality Labels and Ribbons
Low-cost labels are frequently more abrasive, produce more debris, and may have adhesive that migrates onto the printhead. Inferior ribbons leave excessive wax deposits that insulate heating elements and cause burnout, and may require higher darkness settings to transfer — compounding the problem.
High-quality thermal transfer ribbons — wax, wax-resin, and full-resin — are formulated with consistent coatings that minimise friction and clean-transfer ink. Matching the ribbon type correctly to your label substrate (paper vs. synthetic) is equally important: a wax ribbon on a synthetic label not only produces poor output but leaves heavier deposits on the printhead.
Never reuse labels that have fallen on the floor. Contaminated labels carry particles that act as abrasives against the element line.
3. Clean the Printhead and Platen Roller Regularly
Zebra recommends cleaning the printhead after every 2 rolls of media or 1 roll of ribbon — or every 1 million linear inches in high-volume applications. In dusty or humid environments, clean more frequently.
Correct cleaning procedure:
- Power off the printer. Never clean a powered-on or hot printhead.
- Wait for the printhead to cool to room temperature.
- Use a lint-free foam swab or dedicated printhead cleaning pen dampened with 90–99% isopropyl alcohol (IPA).
- Wipe from the centre of the printhead toward the outside — not back and forth.
- Clean the platen roller at the same time using the same materials — debris on the roller re-deposits onto the printhead.
- Allow both surfaces to air dry completely before closing the printer.
Never use: screwdrivers or metal tools to remove residue, paper towels, abrasive pads, acetone, household cleaning sprays, or any alcohol below 90% concentration. These either scratch the protective coating or leave chemical residue that causes corrosion.
4. Manage Print Darkness and Speed Settings
Excessive darkness (heat) is one of the most common — and most preventable — causes of accelerated printhead wear. Set darkness to the lowest level that produces a clear, scannable barcode. Run a print test at progressively lower darkness settings and scan the output — the lowest passing setting is the correct one.
Similarly, reduce print speed to the minimum that meets your throughput requirement. Higher speed means less time for heat to dissipate between cycles, increasing thermal stress on every element. If you find yourself needing to increase darkness to compensate for fading quality, this is a signal to clean the printhead — not to permanently raise the heat setting.
5. Protect Against Static Electricity
Before handling the printhead for any reason — maintenance, media loading, or replacement — take these steps:
- Remove all metal jewellery: rings, watches, bracelets. A ring catching the printhead edge during a media change causes immediate physical damage.
- Use a grounding wrist strap or anti-static mat to discharge any static build-up before touching the printhead or its connectors.
- Never touch the printhead surface with bare fingers — skin oils and static discharge are both damaging.
- In high-static environments (dry air, synthetic flooring), consider anti-static measures for the printer location itself.
6. Keep the Printer and Environment Clean
- Keep the printer lid closed when not in use — open printers accumulate dust and debris on the printhead surface.
- Store labels and ribbons in clean, sealed packaging in a dry environment. Exposed label rolls collect dust that feeds directly into the print mechanism.
- Position printers away from cutting, sanding, adhesive-dispensing, or other particle-generating operations.
- In harsh or dusty environments, use printer enclosures designed for industrial use.
- Maintain ambient operating conditions within Zebra’s recommended range — typically 15–35°C and 20–80% relative humidity. High humidity combined with long standby periods and direct thermal media is a documented cause of galvanic corrosion on the printhead.
Prevention Checklist at a Glance
| Action | Frequency |
|---|---|
| Clean printhead with 90–99% IPA and lint-free swab | Every ribbon roll change, or every 2 rolls of media |
| Clean platen roller | Same time as printhead cleaning |
| Check ribbon is wider than full label web | Every ribbon change |
| Verify darkness setting is at minimum effective level | When changing media or ribbon type |
| Inspect label stock for dust or surface contamination | Every new roll loaded |
| Check printhead pressure balance | When changing media thickness |
| Wear grounding strap when handling printhead | Every time printhead is touched |
| Inspect printhead surface for debris buildup or scratches | Monthly, or when print quality changes |
When Replacement Is the Only Answer
Once a Zebra thermal printhead has a permanently failed heating element, it cannot be repaired. Replacement is the only option. Continued printing on a failed head stresses adjacent elements and can affect other printer components — so prompt replacement is more economical than delayed action.
Replacement printhead costs vary significantly by model:
- Desktop models (ZD series, GK/GX series): typically $150–$400
- Industrial models (ZT series, ZM series): typically $350–$950 or more
These figures make the case for prevention clearly. A single replacement printhead on an industrial printer costs more than a year’s worth of quality consumables and cleaning supplies for an entire printer fleet.
Note on Zebra’s Printhead Protection Program: Zebra offers a programme through authorised resellers that provides free printhead replacements for eligible desktop and industrial Zebra printers when you use Zebra Certified Supplies exclusively. If you operate multiple Zebra printers at significant volume, this programme is worth evaluating through your Zebra reseller.
Frequently Asked Questions
Q: Can a Zebra printhead be repaired if it has a broken element?
No. Once a heating element in a thermal printhead is burned out or physically damaged, it cannot be restored. The entire printhead assembly must be replaced. This is why prevention and early detection are so important — catching contamination before it causes permanent burnout is always preferable to replacement.
Q: How long should a Zebra printhead last?
Under optimal conditions with proper maintenance and quality consumables, a Zebra printhead is typically rated for 1 to 2 million linear inches (approximately 25–50 kilometres of print media). In high-volume industrial applications with ideal conditions, some heads reach nearly 5 million linear inches. Real-world lifespan depends heavily on media quality, maintenance consistency, darkness settings, and environment.
Q: A white line appeared on my labels — do I need a new printhead?
Not necessarily. Clean the printhead thoroughly with 90–99% isopropyl alcohol first. If the line disappears on clean media with a fresh ribbon, the head is fine — debris was blocking the element. If the line returns immediately after cleaning, the element has permanently failed and replacement is required.
Q: My labels are printing faint overall — is my printhead failing?
Uniform fading across the full label width is almost never a printhead failure. Check three things first: darkness setting (increase by 2 increments), print speed (reduce if very high), and ribbon type (confirm wax/wax-resin/resin matches your label substrate). If fading persists after correcting settings, clean the printhead — accumulated contamination can reduce thermal transfer efficiency before causing element failure.
Q: How do I know which replacement printhead to order for my Zebra printer?
The correct replacement printhead is model-specific. Check your printer model number (printed on the label on the underside or back of the printer) and cross-reference with the Zebra parts catalogue or your authorised Zebra reseller. Using an incorrect printhead — even if it physically fits — may produce poor print quality or void your printer warranty.
Protect Your Printhead Before the Next Roll
Printhead failure rarely happens without warning — it builds up through small, preventable problems: a dirty surface here, a slightly narrow ribbon there, a heat setting left a few increments too high. None of these feel urgent until a white line appears on every label and production comes to a stop.
The steps in this guide take less than five minutes per maintenance cycle. Against the cost of a replacement printhead — let alone the cost of downtime — that five minutes is one of the highest-return investments in your printing operation.
If you are looking for high-quality thermal transfer ribbons that are formulated to minimise printhead wear and matched to Zebra printer specifications, Hansprintec offers wax, wax-resin, and full-resin ribbons for barcode, label, and industrial printing applications. Using the right ribbon from the start is the simplest single change you can make to extend printhead life.
Have a question about printhead compatibility, ribbon selection, or a print quality problem you cannot diagnose? Contact our team — we are happy to help you find the right solution before a small problem becomes an expensive one.
