
How to Replace the Printhead on a Toshiba BA410T: Counter Reset and Self-Test Guide
Replacing the printhead is an important maintenance task when a Toshiba BA410T thermal printer starts producing poor or inconsistent print quality.
However, installing a new printhead is not the end of the process. After replacement, the printhead mileage/counter should be cleared, and a self-test page should be printed to verify the counter and print quality.
In this guide, we explain the complete Toshiba BA410T printhead replacement process, including how to clear the printhead counter, how to print the diagnostic/self-test page, and what to check after installing a new printhead.
The procedure in this guide is based on the Toshiba BA410T/BA410 series. Always confirm the printer model, printhead part number, and resolution before ordering a replacement printhead.
When Should You Replace a Toshiba BA410T Printhead?
The thermal printhead is a consumable component and gradually wears during normal operation.
You may need to replace the printhead if you notice:
- Faded or light printing
- Missing dots
- Vertical lines in printed labels
- Uneven print density
- Poor barcode readability
- Inconsistent print quality
- Cleaning the printhead no longer improves the printing result
Before replacing the printhead, however, it is important to check the platen roller and other components that may also affect print quality.
What to Check Before Replacing the Printhead
Check the Platen Roller
Before installing a new printhead, inspect the platen roller underneath it.
A worn, damaged, hardened, or uneven platen roller can cause poor print quality even after a new printhead has been installed.
Check the platen roller for:
- Visible wear
- Uneven or damaged areas
- Hardening
- Flat spots
- Excessive contamination
If the platen roller is seriously worn or damaged, it may be necessary to replace it together with the printhead.
Installing a new printhead while continuing to use a severely worn platen roller may not solve the print quality problem.
Complete Toshiba BA410T Printhead Replacement Process
After confirming that the printhead needs to be replaced, follow the complete process below:
1. Replace the printhead
↓
2. Clear the printhead mileage/counter
↓
3. Print the self-test/inspection page
↓
4. Confirm that the counter shows 0 and check the print quality
We also recommend watching the video below if you want to see the complete operation.
Watch the Complete BA410 Printhead Replacement Video
Video: Toshiba BA410 Printhead Replacement, Counter Reset and Self-Test
This video demonstrates the complete operation, including replacing the printhead, clearing the printhead mileage/counter, and printing the inspection/self-test page.
Prefer a visual walkthrough? Watch the video above to see the complete process step by step.
Step 1: Replace the Toshiba BA410T Printhead
Before replacing the printhead, turn off the printer and allow it to cool if it has been operating for an extended period.
Remove the old printhead according to the printer’s maintenance procedure and install the replacement printhead carefully.
Make sure that:
- The replacement printhead is the correct model and resolution.
- The printhead is installed securely.
- The cable/connector is properly connected.
- The printhead surface is clean.
- The platen roller is in good condition.
After installation, the next important step is to clear the printhead mileage/counter.
Step 2: Clear the Printhead Mileage/Counter
When a new printhead is installed, the previous printhead’s accumulated mileage should be cleared.
On the Toshiba BA410T, the counter can be cleared through SYSTEM MODE.
How to Clear the Printhead Counter
- Turn off the printer.
- Press and hold FEED and PAUSE, then turn on the printer.
- When SYSTEM MODE appears, press FEED.
- Select RAM CLEAR and press PAUSE.
- Select MAINTE.CNT CLEAR and press PAUSE.
- Select ALL COUNTER and press PAUSE.
- When CLEAR… appears, turn off the printer.
- Turn the printer on again.

Repeat the Counter Reset 2–3 Times
To make sure the counter has been completely cleared, we recommend repeating the counter-clear procedure 2–3 times.
After completing the reset procedure, print the self-test/inspection page and check the recorded printhead mileage.
The counter should show:
0
If it does not show 0, repeat the counter-clear procedure and check again.
Step 3: Print the Toshiba BA410T Self-Test Page
After clearing the printhead counter, print a self-test/diagnostic page.
This allows you to check two important things:
- Whether the printhead mileage/counter has been reset to 0
- Whether the new printhead is producing good print quality
How to Print a Self-Test Page
- Turn off the printer.
- Press and hold FEED and PAUSE, then turn on the printer.
- When SYSTEM MODE appears, press FEED.
- Select DIAGNOSTIC and press PAUSE.
- When MAINTENANCE COUNTER appears, press PAUSE three times.
- When CHECKING & PRINT appears, wait for the printer to complete the operation.
- The printer will automatically print the self-test/inspection page.
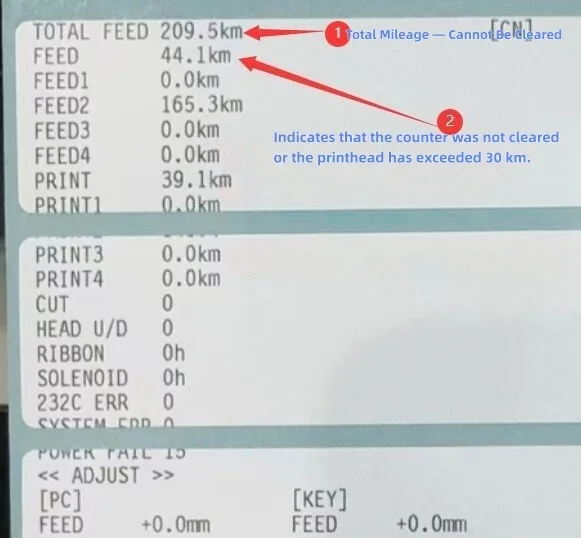
The exact appearance of the self-test page may vary depending on the printer model.
Step 4: Check the Printhead Mileage and Print Quality
Now inspect the printed self-test page carefully.
Check the Printhead Counter
The printhead mileage/counter should show:
0
A value of 0 confirms that the counter has been successfully cleared.
This image is actually very valuable. I recommend putting it immediately after the explanation of “0”.
The user can visually compare their own printout with your example instead of simply trusting a sentence saying “the counter should be 0.”
Check the Print Quality
At the same time, inspect the test page for:
- Missing dots
- Vertical lines
- Uneven print density
- Faded areas
- Unclear characters
- Poor barcode quality
- Other abnormalities
If the counter shows 0 and the print quality is normal, the printhead replacement and counter reset process is complete.
Why Is It Important to Clear the Printhead Counter?
Clearing the printhead counter after replacing the printhead is important for accurate mileage tracking.
If the counter is not cleared, the previous printhead’s accumulated mileage may continue to be associated with the newly installed printhead.
For example, if the old printhead had already accumulated significant mileage and you install a new printhead without clearing the counter, the recorded mileage may continue from the previous value instead of starting from zero.
This can cause problems when checking the actual usage of the new printhead and may affect warranty evaluation.
Therefore, after installing a new printhead, we recommend:
Replace the printhead → Clear the counter → Repeat the reset 2–3 times if necessary → Print the self-test page → Confirm the counter shows 0.
Toshiba Printhead Warranty: 3 Months or 30 km
For the Toshiba printheads covered by this warranty policy, the warranty is:
3 months or 30 km, whichever comes first.
This makes accurate printhead mileage tracking particularly important.
If the counter is not cleared after installing a new printhead, the previous mileage may continue accumulating with the new printhead. If the recorded mileage later exceeds the applicable warranty mileage limit, it may affect the evaluation of a warranty claim.
For this reason, we recommend clearing the counter immediately after installing a new printhead and confirming that the recorded mileage shows 0.
Toshiba BA410, BA410T and BA420 Printhead Compatibility
The printhead covered in this guide is not limited to the Toshiba BA410T.
The corresponding printhead can also be used for:
- Toshiba BA410
- Toshiba BA410T
- Toshiba BA420
It can also replace printheads used in:
- Toshiba SA4TM
- Toshiba SA4TP
Therefore, if you are searching for a:
- Toshiba BA410 printhead
- Toshiba BA410T printhead
- Toshiba BA420 printhead
- Toshiba SA4TM printhead
- Toshiba SA4TP printhead
you may be looking for the same replacement printhead solution.
However, always confirm the exact part number and printhead resolution before ordering. If you are unsure about compatibility, send us the printer model or the part number from your existing printhead, and we can help verify it.
Troubleshooting After Toshiba BA410T Printhead Replacement
If the print quality is still poor after installing a new printhead, check the following before assuming that the new printhead is defective.
1. Check the Platen Roller
A worn or uneven platen roller can cause inconsistent printing.
2. Check the Printhead Installation
Make sure the printhead is properly installed and the connector is securely connected.
3. Check for Contamination
Make sure the printhead surface is clean and free from residue.
4. Check Printer Settings
Print speed, darkness, and other settings can affect print quality.
5. Print Another Self-Test Page
Run the diagnostic/self-test procedure again and check both the print quality and counter information.
Need a Replacement Toshiba BA410T Printhead?
If your Toshiba BA410, BA410T, or BA420 needs a replacement printhead, we can help you identify the correct model.
We supply original and compatible Toshiba printheads, including printheads that can replace SA4TM and SA4TP models.
Before ordering, please provide:
- Printer model
- Existing printhead part number
- Printhead resolution, if available
- Original or compatible requirement
- Required quantity
We can then confirm compatibility and provide availability and a quotation.
Looking for a Toshiba BA410T printhead?
Contact us with your printer model or existing printhead part number for compatibility confirmation and pricing.
Frequently Asked Questions
How do I replace a Toshiba BA410T printhead?
Turn off the printer, remove the old printhead, install the correct replacement printhead, and make sure the connector is properly connected. After installation, clear the printhead counter and print a self-test page to verify the result.
What should I do after installing a new BA410T printhead?
First, clear the printhead mileage/counter. We recommend repeating the counter-clear operation 2–3 times if necessary. Then print the self-test page and confirm that the counter shows 0 and the print quality is normal.
How do I know if the printhead counter has been cleared?
Print the diagnostic/self-test page after resetting the counter. If the printhead mileage/counter shows 0, the counter has been successfully cleared.
Why does the printhead counter need to be reset?
If the counter is not cleared, the previous printhead’s mileage may continue to accumulate with the new printhead. This can result in inaccurate mileage tracking and may affect warranty evaluation.
What is the Toshiba printhead warranty?
The applicable warranty is 3 months or 30 km, whichever comes first.
Can the same printhead be used for Toshiba BA410 and BA420?
The corresponding printhead can be used for Toshiba BA410/BA410T and BA420 models. However, always confirm the exact printhead part number and resolution before ordering.
Can this printhead replace SA4TM and SA4TP?
Yes. The corresponding printhead can also be used as a replacement for SA4TM and SA4TP printheads. If you are unsure about compatibility, send us the part number of your existing printhead for confirmation.
What information should I provide when ordering a Toshiba replacement printhead?
The printer model and existing printhead part number are the most useful information. If available, also provide the printhead resolution and required quantity.
